How do I change the ink cartridges in my printer?
Make sure you have your replacement cartridges handy before you begin. You must install new cartridges immediately after removing the old ones.
Leave your old cartridges in the printer until you are ready to replace them to prevent the print head nozzles from drying out. Do not open ink cartridge packages until you are ready to install the ink.
Select your printer range from the list below:
Expression Home series printer without an LCD panel
- Turn on your product.
-
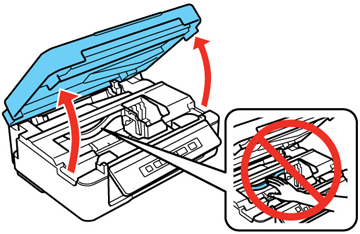
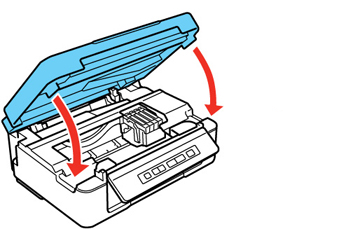
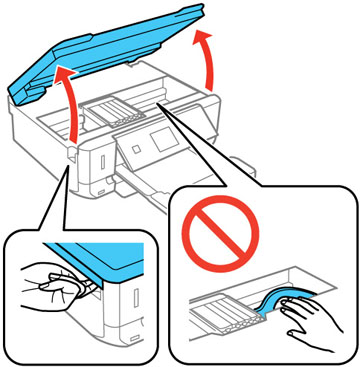
Lift up the scanner unit.
 Caution:
Do not move the print head by hand; otherwise, you may damage your product. Do not touch the flat white cable inside the printer.
-
Press the
 Stop button
-
If a cartridge is low or expended, the print head moves that cartridge to the indicator position. Press the Stop button again to check for additional low or expended cartridges. When all cartridges have been identified, the print head moves to the replacement position.
- If no cartridges are low or expended, the print head does not move. If you want to replace a cartridge before it is low or expended, press the Stop button for 6 seconds. The print head moves to the replacement position.
-
If a cartridge is low or expended, the print head moves that cartridge to the indicator position. Press the
-
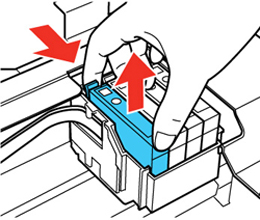
Squeeze the tab on the cartridge and lift the cartridge straight up to remove it.
-
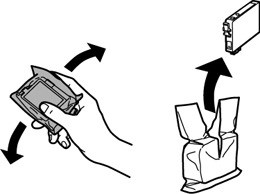
Before opening the new cartridge package, shake it gently four or five times.
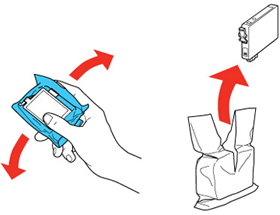
- Remove the cartridge from the package.
-
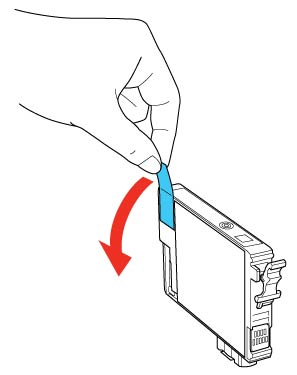
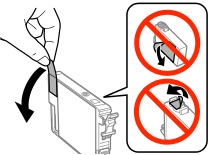
Remove the yellow tape from the side of the cartridge.
-
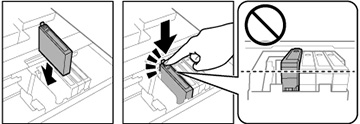
Insert the new cartridge into the holder and push it down until it clicks into place.

-
Lower the scanner unit.
-
Press the
Stop button. The print head moves to its home position and the printer starts charging the ink. This takes about 1.5 minutes. When the  power light stops flashing and remains on, ink charging is finished. Caution:
Never turn off the product while the power light is flashing or you will waste ink.
Expression Home series printer with an LCD panel
-
Turn on your product.
- If an ink cartridge is expended, you see a message on the LCD screen. Note which cartridges need to be replaced and press the OK button, then choose Replace now.
- If you are replacing a cartridge before you see a message on the LCD screen, press the
 Home button, and select Setup. Select Maintenance, then select Ink Cartridge Replacement and press the OK button.
-
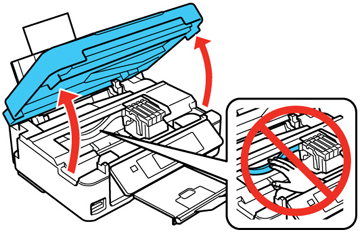
Lift up the scanner unit.
 Caution:
Do not move the print head by hand, otherwise you may damage your product. Do not touch the flat white cable inside the printer.
-
Squeeze the tab on the cartridge and lift the cartridge straight up to remove it.
-
Before opening the new cartridge package, shake it gently four or five times.
- Remove the cartridge from the package.
-
Remove the yellow tape from the side of the cartridge.
-
Insert the new cartridge into the holder and push it down until it clicks into place.
-
Lower the scanner unit and press the
 Start button.
Expression Photo or Premium series printer
- Make sure that the CD/DVD tray is not inserted for printing.
-
Turn on your product.
- If an ink cartridge is expended, you see a message on the LCD screen. Note which cartridges need to be replaced and press the OK button, select the option to replace the ink cartridge and press the OK button.
- If you are replacing a cartridge before you see a message on the LCD screen, press the Home button, and select Setup > Maintenance > Ink Cartridge(s) Replacement and press the Start button.
-
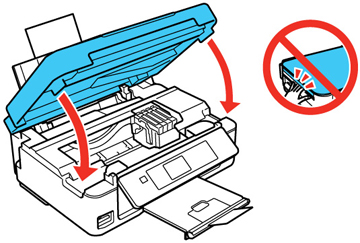
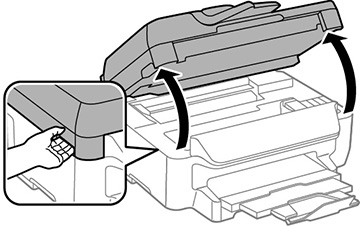
Lift up the scanner unit.
 Caution:
Do not move the print head by hand, otherwise you may damage your product. Do not touch the flat white cable inside the printer.
-
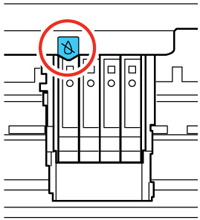
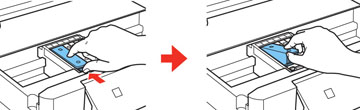
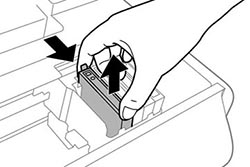
Push in the blue tab to unlock the ink cartridge you are replacing. Then lift the bottom of the ink cartridge to remove it.
-
Recap the used ink cartridge using the cap that came with it.
-
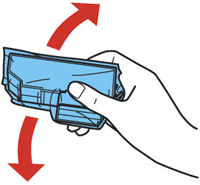
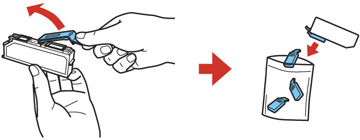
If you are replacing the Black (BK) ink cartridge, shake the new cartridge gently four or five times before unwrapping it. You do not need to shake the Photo Black (PBK) cartridge or any of the other color ink cartridges.
 Caution:
Do not shake the cartridges after opening the packages, or ink may leak.
-
Remove the cartridge from the package.
 Caution:
Do not touch the areas shown above. Doing so may prevent normal operation and printing.
-
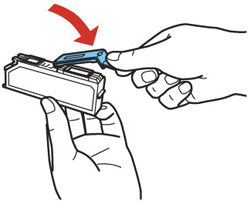
Remove the cap from the cartridge and store it for later use.
-
Insert the ink cartridge at a slight angle into the ink cartridge holder as shown. Then press the bottom of the ink cartridge down until it clicks into place.
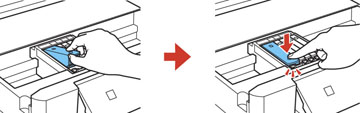
- After you replace all the cartridges that need replacing, close the scanner unit. The product starts priming the ink. This takes a few minutes. When you see a completion message on the LCD screen, ink replacement is complete.
WorkForce series printer
-
Turn on your product.
- If an ink cartridge is expended, you see a message on the LCD screen. Note which cartridges need to be replaced, then select Proceed and follow the instructions on the screen.
- If you are replacing a cartridge before you see a message on the LCD screen, press the Home button, and select Setup > Maintenance > Ink Cartridge Replacement and press the Colour button.
-
Lift up the scanner unit.
 Caution:
Do not touch the flat white cable inside the printer.
-
Squeeze the tab on the cartridge and lift the cartridge straight up to remove it.
-
Gently shake the new cartridge four or five times as shown. Then remove the cartridge from the package.
-
Remove only the yellow tape.
-
Insert the new cartridge into the holder and push it down until it clicks into place.
- Close the scanner unit. The product starts priming the ink. This takes a few minutes. When you see a completion message on the LCD screen, ink replacement is complete.
Replace ink cartridges using a computer
Windows
You can view on-screen instructions for replacing an ink cartridge using the printer maintenance utilities.
-
Click Print from your application's File menu, highlight the Epson printer icon, then click Properties/Printing Preferences.
- You can also access this by right-clicking on the Epson printer icon in the Devices and Printers/Printers/Printers and Faxes folder (refer to How to open the Devices and Printers folder in Windows) and then left-click on Printing Preferences.
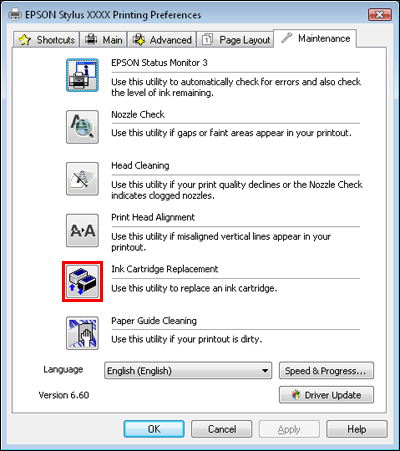
- In the Epson preferences window, click on the Maintenance/Utility tab.
-
If you need to replace an ink cartridge before it is low or expended, click on the Ink Cartridge Replacement button on the Maintenance/Utility tab.
macOS
You can view on-screen instructions for replacing an ink cartridge using the printer maintenance utilities. You can access this section in the following ways:
- Double-click the EPSON Printer Utility3 icon in the Applications folder in the Macintosh hard drive.
- If prompted, select the printer from the Printer List, then click OK.
- Click Print from your application's File menu, highlight the Epson printer icon, then click Print Settings from the pull-down menu in the 'Print' window (for 10.5, you may need to click on the arrow to expand the window).
-
Click on the
 Utility icon. (The Utility icon is not displayed when the printer is shared.)
- For Mac OS X 10.3, 10.4 only: Open the Mac OS X hard drive, then browse to the /Applications/Utilities folder and double-click the Printer Setup Utility icon. Select the appropriate printer from the list, then click the Utility button.
-
If you need to replace an ink cartridge before it is low or expended, click on the Ink Cartridge Replacement button in the Epson preferences window.
EpsonPrinterUtility3 EpsonPrinterUtility4 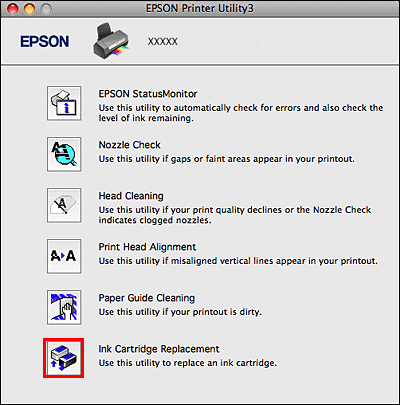
|
If the |
 ink light is on or you see an error on the LCD screen telling you an ink cartridge is installed incorrectly after the print head moves to its home position, an ink cartridge may not be recognised correctly.