How to scan to a network computer using the Push-Scan button on the control panel (Scan to PC/ PDF/ Email)
How to Scan to a Network Computer Using the Push-Scan Button (Scan to PC / PDF / Email)
Applies To
Software: Epson Event Manager, EPSON Scan
Hardware: Epson All-In-One products with a Scan button on the control panel.
- Related Articles:
Description
Push-Scan lets you scan over a network to a computer directly from the printer's control panel, without needing to start the scan from the computer itself. The printer and computer must be on the same network. Before starting, make sure the latest version of Epson Event Manager is installed for your product.
Note (Windows): The EPSON Event Manager icon must be visible in the Windows taskbar notification area before pressing the push-scan button — Event Manager needs to be running and ready to scan.
Solution
Available Push-Scan Options
- Scan to PC: automatically scans and saves the original as a JPEG on your computer.
- Scan to Email: scans and attaches the image to an email message.
- Scan to PDF: automatically scans and saves the original as a PDF on your computer.
- Scan to PC (WSD): A4, Colour, 300dpi, JPEG — not available on all products; check your product's user guide.
To assign a specific program to a scan function, see KA-01629.
Starting the Scan
-
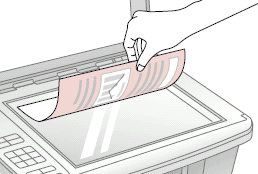
Place the original horizontally on the document bed.
- Press the Scan button on the control panel to enter Scan mode.
-
Use the Left/Right buttons to select an option (Scan to PC / Scan to Email / Scan to PDF), then press OK.

- Use the Up/Down buttons to select a computer from those detected on the network (or the USB-connected computer, if applicable). Highlight it and press OK.
-
Scanning starts automatically on the selected computer, using each mode's default settings:
- Scan to PC: A4, Colour, 300dpi, JPEG — saved to the specified location and shown as a thumbnail.
- Scan to PDF: A4, Black & White, 300dpi, PDF — saved to the specified location.
- Scan to Email: A4, Colour, 150dpi, JPEG — opens the Send File Via E-mail window after scanning.
- Scan to PC (WSD): A4, Colour, 300dpi, JPEG — scanned via Windows Fax and Scan.
Troubleshooting
First, confirm EPSON Scan works independently of any other software.
If the EPSON Scan Test Fails
- Confirm the correct printer model is selected next to Select Scanner.
- Confirm the correct Connection is selected: Local for USB, Strong for Wi-Fi/Ethernet.
- Click Test again.
- If it still fails, see KA-01403.
General Checks
- Confirm the product is powered on.
- If connected via USB or Ethernet, confirm both cable ends are secure.
- Open EPSON Scan. If you see "EPSON Scan cannot be started," open Epson Scan Settings and click Test.
-
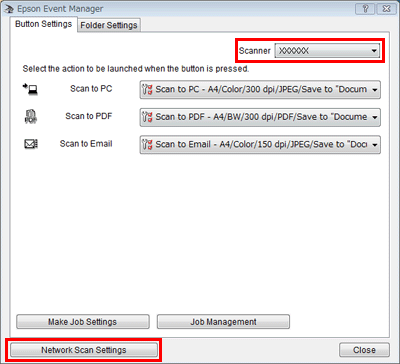
Check EPSON Event Manager allows network scanning:
- Open Event Manager.
-
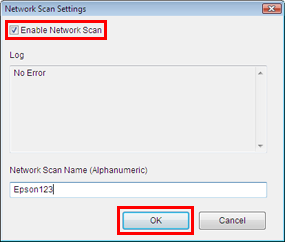
On the Button Settings tab, confirm Enable Network Scan is ticked in the Network Scan Settings dialog.
-
Optionally change the Network Scan Name — this is what appears on the printer's LCD when using a Scan to PC function. It must contain both letters and numbers (e.g. "Epson123"). Use a unique, recognisable name on each computer (e.g. "MaryPC1", "Computer1"). Click OK to close.
- If still unsuccessful over a network connection, see KA-01402 (EPSON Scan) or KA-01452 (Epson Scan 2).
- Try the push-scan feature again.
Additional Checks for Windows
-
Check whether the Event Manager icon appears in the Windows taskbar notification area.
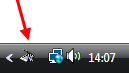
- If it isn't shown, Windows may be hiding inactive icons. Open EPSON Event Manager from its Desktop shortcut or the Start menu, then check the notification area again.
- If it's still not shown, right-click the notification area near the clock, select Properties, and either untick Hide inactive icons, or click Customize and set the EPSON Event Manager icon to Always show.
