How to install an ICA driver and scan with Image Capture
Applies To
- Operating Systems: macOS
- Hardware: Epson scanners and All-In-Ones not supported by a full Epson Scan driver on the current macOS version.
- Related Articles:
Description
Some older products aren't supported by a full Epson scanner driver on the latest macOS versions. Basic scanning is still available using Image Capture (ICA), which is built into macOS, via Epson's ICA driver.
Note: If your product is supported by an Epson Scan driver, use that instead for the best functionality — see KA-01092.
Solution
Installing the ICA Driver
The latest ICA Scanner Driver for your product is available only via Apple's Software Update, not a direct Epson download.
-
Prepare your product's connection:
- USB or Ethernet: connect the printer/scanner to your Mac and make sure it's powered on.
- Wireless, already connected to your router: make sure the printer is powered on.
- Wireless, not yet connected to your router: connect it via the printer's control panel first. Note that single-function scanners don't work with ICA drivers over a wireless connection — only USB/Ethernet.
- Select the Apple menu, then select Software Update or App Store.
- Follow the on-screen instructions to install the available updates.
Scanning With Image Capture
- Make sure the scanner or All-In-One is powered on and connected directly to your Mac via USB.
- Open Finder, type Image Capture, and open the application.
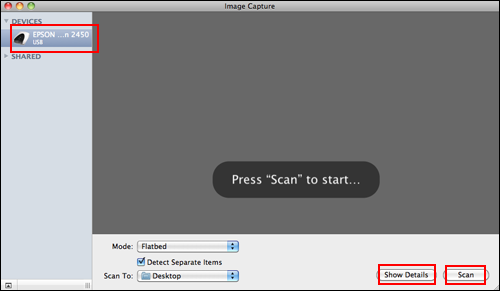
- Your Epson product appears under Devices or Shared on the left. Click its name to see basic settings, including scan mode and save location.
-
Click Scan to start scanning.
-
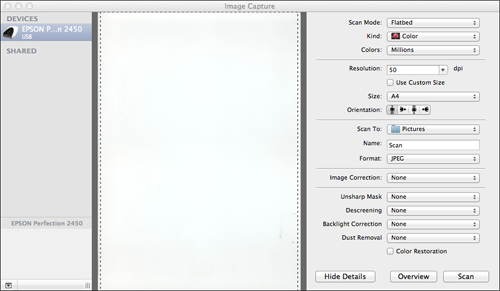
For more options — Kind (Text, Colour, or Black & White photo), Resolution, Size, Format, and Image Correction — click Show Details for advanced settings.
- Once finished, the scanned image saves to your chosen location.
Note: For more detail on Image Capture's specific scan settings, see the guide within the application itself, via its Help menu.
