How to Fix Print Quality Issues on Epson EcoTank and Expression Printers
Applies To
- Operating Systems: Windows 10, Windows 11, macOS
- Hardware: Epson EcoTank and Expression Series Printers (e.g., ET-4950, L6390, XP-2200 and similar models)
- Software: Epson Printer Driver
Description
If your Epson EcoTank or Expression printer is printing blank pages or has blurry text, run a Nozzle Check followed by Head Cleaning via the printer driver Maintenance tab. For severe clogs, a Power Cleaning may be required (for models where this feature is available).
Symptoms
Perform these steps if your printer exhibits any of the following issues:
- Faint Output: Printed text or images appear faded or light.
- Banding: Horizontal white lines or streaks appearing across the page.
- Incorrect Colors: Specific colors are missing or look distorted.
- Blank Pages: The printer runs, but no ink appears on the paper.
- Broken Nozzle Pattern: A Nozzle Check printout shows gaps or missing segments.
Solution
1. Preparation and Safety
- Check Ink Levels: Ensure all ink tanks are filled above the lower limit line. Running cleaning cycles with low ink can damage the printer.
- Power Management: Do not turn off the printer or open the scanner unit during a cleaning cycle.
- Paper: Load a few sheets of plain paper into the rear feed or paper cassette.
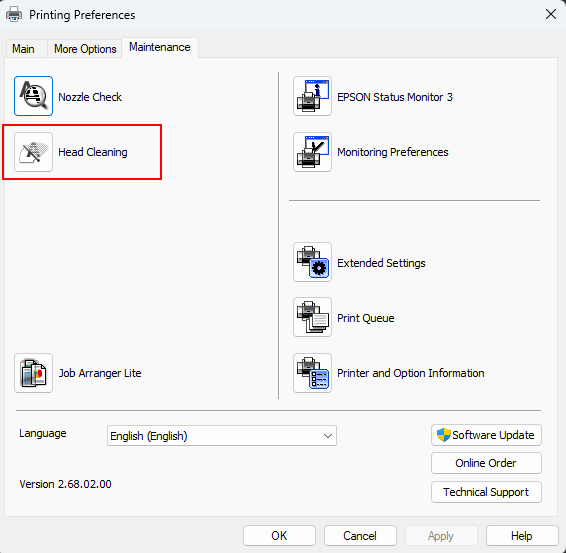
2. Accessing the Maintenance Menu
The cleaning utilities are located in the printer driver settings:
- Select Start.
- Go to Settings > Bluetooth & devices > Printers & scanners.
- Select your Epson Printer (e.g. ET‑4950).
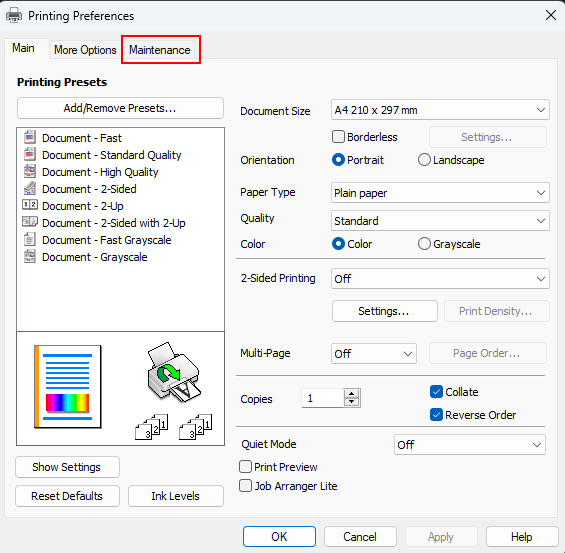
- Select Printing Preferences.
-
Open the Maintenance tab.
- Open Control Panel.
- Go to Hardware and Sound > View devices and printers.
- Right‑click your Epson Printer (e.g., ET‑4950/L6390) and select Printing Preferences.
-
Open the Maintenance tab.
- Open the Apple menu and choose System Preferences (or System Settings in newer macOS versions).
- Select Printers & Scanners (or Print & Scan / Print & Fax).
- Choose your Epson Printer (e.g., ET‑4950/L6390) from the list.
-
Click Options & Supplies, then go to the Utility tab.
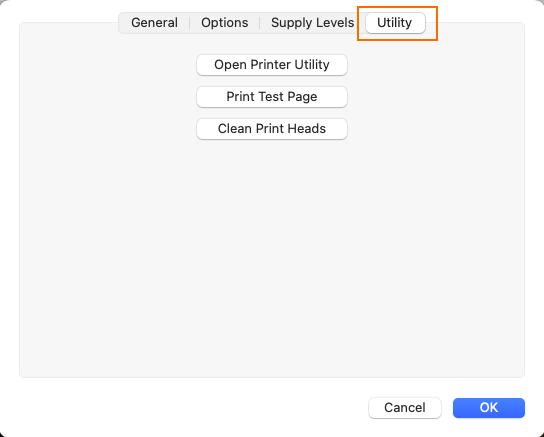
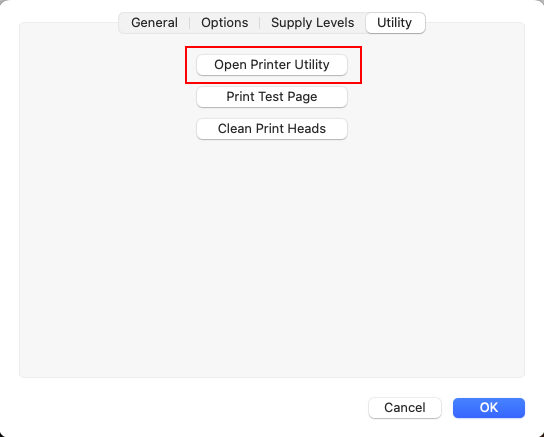
-
Click Open Printer Utility to access Epson tools such as and (if available)
Nozzle Check,
Head Cleaning,
Power Cleaning.
Cleaning Methods Overview
| Cleaning Type | When to Use | Description |
|---|---|---|
| Nozzle Check | Before & after cleaning | Prints a test pattern to identify clogging. |
| Head Cleaning | Mild/moderate clogging | Standard cleaning cycle to clear blocked nozzles. |
| Power Cleaning (if available) | Severe clogging or repeated failures | Deep clean that uses more ink. |
3. Cleaning Procedures
Step A: Run a Nozzle Check
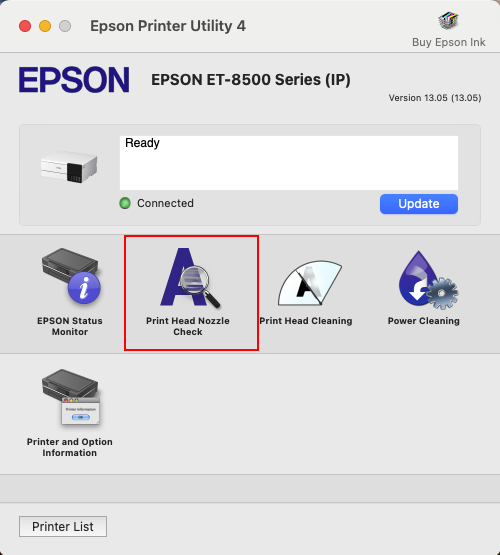
- For macOS use the images from above for reference.
-
In the Maintenance tab, click Nozzle Check.

- Click Print.
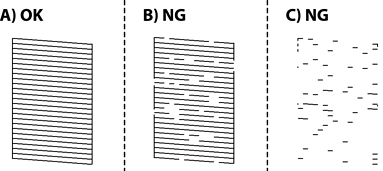
- For each colour, check the printed pattern to see if the print head nozzles are clogged. Refer to the image and matrix below to determine your next step.
Troubleshooting Matrix
| Symptom | Recommended Action |
|---|---|
| All lines are printed | No further steps are needed |
| Some nozzles are clogged (image B) | Perform Head Cleaning (Step B); Repeat up to 3x |
| Blank page or most lines are missing (image C - more than 50% missing) | If option available perform Power Cleaning (Step C) otherwise perform Head Cleaning (Step B); Repeat up to 3x |
| No improvement after 3 cleanings (Step B) | If option available perform Power Cleaning (Step C) |
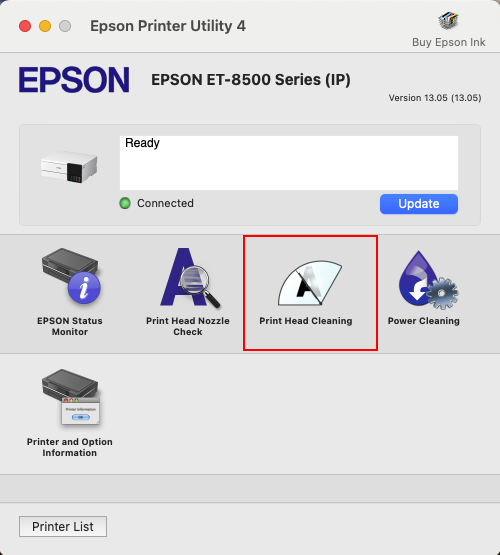
Step B: Head Cleaning
- For macOS use the images from above for reference.
-
In the Maintenance tab, click Head Cleaning.
- Click Start and wait for the process to complete (the power light will stop flashing).
- Run another Nozzle Check. If the pattern is still broken, repeat this cleaning up to 3 times.
-
If print quality does not improve after a head cleaning:
-
If power cleaning option is not available:
-
Turn the printer off using the printers' Power button. This ensures the print head is capped correctly to prevent it from drying out in the future.
-
Wait 12 hours.
-
Repeat steps 1, 2 and 3 for Head Cleaning.
-
-
If Power Clean option is available continue to Step C.
-
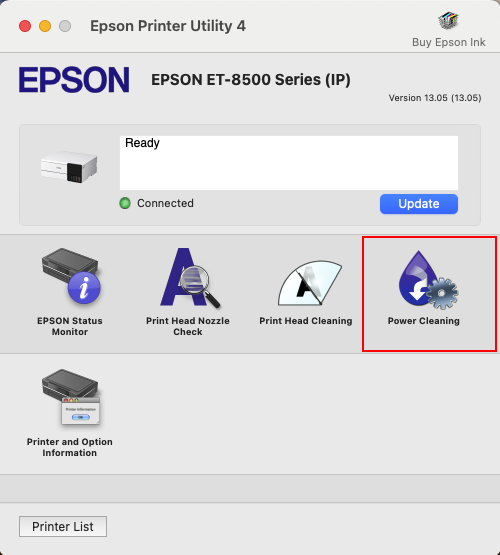
Step C: Power Cleaning
- For macOS use the images from above for reference.
-
In the Maintenance tab, click Power Cleaning (or Power Ink Flushing).

- Follow the on-screen prompts. Ensure you have enough ink (at least 1/3 full).
- Once finished, run a final Nozzle Check.
-
If print quality does not improve after a Power Cleaning:
-
Turn the printer off using the printers' Power button. This ensures the print head is capped correctly to prevent it from drying out in the future.
-
Wait 12 hours. This allows trapped air to dissipate and dried ink to soften before trying one more standard cleaning.
-
How to Prevent Clogged Print Heads
- Print Weekly: Print at least one color test page per week to keep ink flowing.
- Power Down Correctly: Always use the Power Button on the printer. This "caps" the print head to prevent it from drying out. Never unplug the power cable whilst printer is on.
- Environment: Avoid placing the printer in direct sunlight or near a heater, as heat evaporates ink in the nozzles.