How do I set up Epson Connect Email Print on my printer/All-In-One?
Applies To
- Hardware: Epson Connect compatible printers — see the Epson Connect page for the full list.
- Related Articles:
Description
Note: Your printer needs to communicate continuously with the Epson Connect server via HTTP and XMPP (port 5222). Make sure you have an internet connection and that port 5222 is open on your network. This restriction typically only affects business/enterprise networks, not a typical home network.
Choose whichever scenario below matches your situation.
Solution
Setting Up for the First Time (Software Not Yet Installed)
-
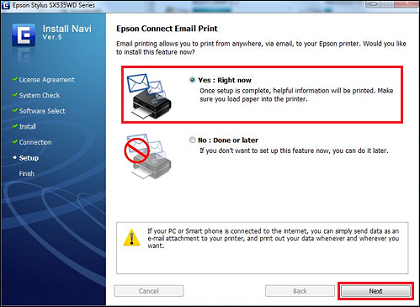
The Epson Connect registration screen is part of the software installation process. Insert the software CD and follow the on-screen installation prompts until you reach the Epson Connect screen. Select Yes: Right now, then click Next.
-
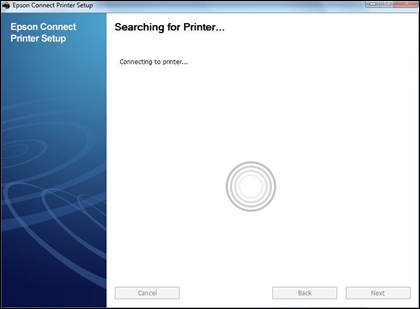
The Epson Connect Email Print setup tool downloads from the Epson Connect server, then searches for supported printers on your network.
-
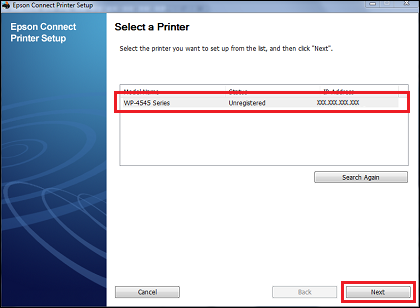
Select the printer you want to configure and click Next.
-
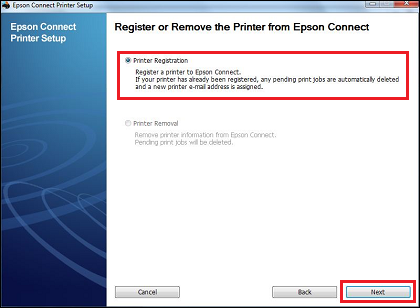
Select Printer Registration and click Next.
- Read and accept the licence agreement, then click Next.
-
Make sure plain paper is loaded, then click OK to continue.
Note: A connection confirmation page prints automatically during registration — make sure you complete the full installation process to finish configuring Email Print.
-
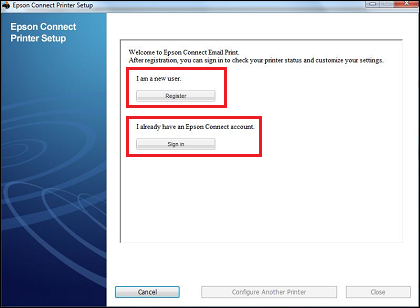
New users need to register the printer and create an account; existing users can register the printer to their existing account.
-
New users need to provide:
- Username: an existing personal email address — this becomes your login for the Epson Connect Email Print website.
- Password: a password for the Epson Connect website.
- Regional settings: your language, time zone, and time format.
Click Register to continue.
-
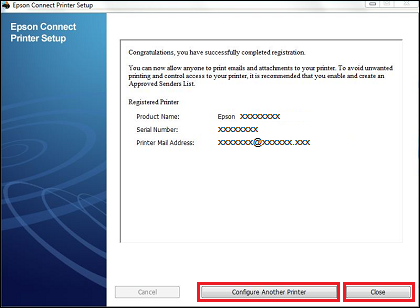
Once registration completes, a summary screen appears.
-
Click Close to finish, or Configure Another Printer to set up an additional one.
Tip: You can change your Printer Mail Address to something more memorable via the Epson Connect Email Print website.
Software Already Installed, Configuring Epson Connect Later
If your printer's software is already installed and you now want to configure Epson Connect, run the Epson Connect Printer Setup Tool from your program list:
- Windows: Start > Programs > Epson > Epson Connect Printer Setup.
- macOS: Mac HD > Applications > Epson > Epson Connect Printer Setup.
If this isn't installed, download it via Epson Download Navigator — see KA-01626 for details.
-
When you run the Epson Connect Printer Setup tool, the software will search for supported printers on your network.
-
Select the printer you would like to configure and click Next.
-
Select the Printer Registration option and click Next.
-
Read and agree to the License agreement then click Next.
-
Load& some plain paper in to your printer and click OK to continue.
During the registration process a connection confirmation page is printed. You must ensure you complete the installation process to finish configuring Epson Connect Email Print for your printer.
-
If you are a new user, you will need to register the printer and create a new account. Existing users can register a printer to an existing account.
-
New users will need to provide the following information in order to create their account.
Username: Enter an existing personal email address and confirm. This will be the login to the Epson Connect Email Print website where you can manage your account.
Password: Enter a password you will use to access the Epson Connect Email Print website
Regional settings: Enter your Language, Time Zone and Time Format.
Click Register to continue or Cancel to exit.
-
Once registration has completed, the following summary screen is displayed:
Click Close to finish or Configure Another Printer to setup a different printer.
You can change your Printer Mail Address to something more memorable by visiting the Epson Connect Email Print website
