How to Remove Jammed Paper
Applies To
All Epson printers
Symptom
- The printer displays a paper light error.
- The printer displays a Paper Jam or Remove jammed paper message
- Paper is partially fed or not visible inside the printer.
Cause
- Obstruction in the paper feed path (torn paper or other foreign matter).
- The paper is damaged (wrinkled or damp).
- The paper is loaded incorrectly.
- Unsupported media is used.
- The weight of the paper is not supported.
- Too many sheets of paper have been loaded
Solution
Follow the steps below to safely remove jammed paper:
Before you start, please note the below points:
|
-
Turn off the printer
Turn off the printer and disconnect the power cable from the Epson device before removing any paper jam or foreign matter. -
Check the paper being used
Check that the media that you're using is not damaged or damp, and that it is a supported media type for your product, Refer to the user guide for supported media types. -
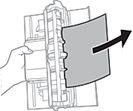
Check the paper feed
Carefully remove any jammed paper by pulling it out in the direction of the paper path.
Expression XP Series
EcoTank / L Series
-
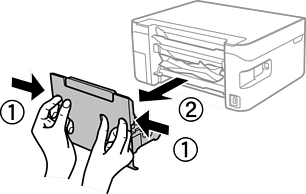
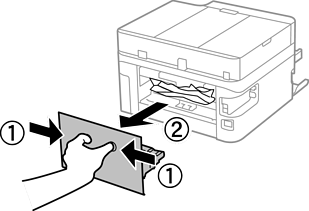
Check the rear paper feed (If applicable to your printer)
-
Remove the rear cover
Expression XP Series
EcoTank / L Series
-
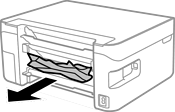
Remove jammed paper from the rear cover
-
Carefully remove any jammed paper by pulling it out in the direction of the paper path.
Expression XP Series
EcoTank / L Series
-
Remove the rear cover
-
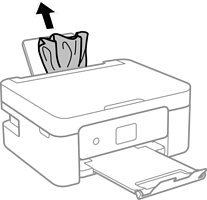
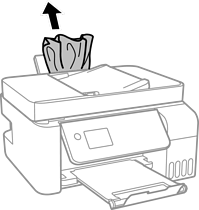
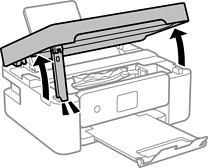
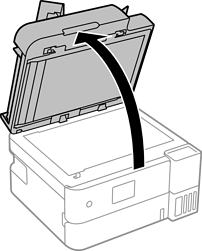
Open the scanner unit to check inside the printer
- Ensure the document cover is closed
-
Lift the scanner unit fully until it clicks, on some models you may need to raise the control panel to lift the scanner.
Expression XP Series
EcoTank / L Series

-
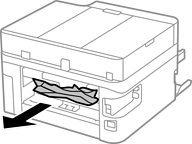
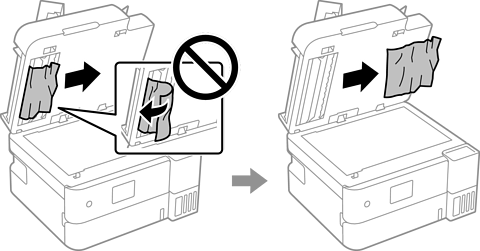
Carefully remove any paper inside the printer
Expression XP Series
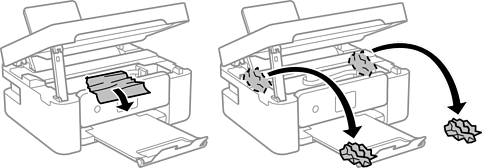
EcoTank / L Series
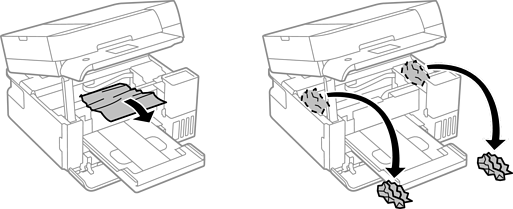
 Warning:
Do not touch the flat white cable or translucent film inside the printer

-
Check for torn pieces
Make sure no small pieces of paper remain in the printer, as these can cause repeat jams. -
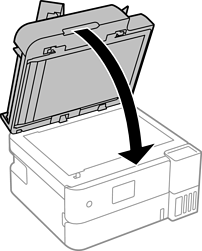
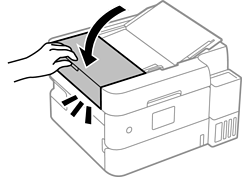
Close all covers securely
Fully close the scanner unit and reattach any covers you removed.
For safety, the scanner unit is closed in two steps.Expression XP Series

EcoTank / L Series
-
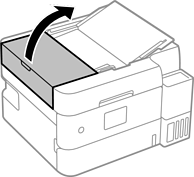
Check the Automatic Document Feeder (ADF) (If applicable to your printer)
- Carefully remove any documents that are not jammed.
-
Lift the ADF cover gently until it opens fully.
-
Check inside for any jammed paper.
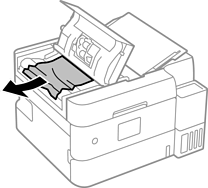
-
Open the document cover.
-
Slowly pull the paper in the direction of the paper path.
Do not pull paper backwards or use force, as this can damage the feeder. - Use both hands and remove the paper evenly to avoid tearing it.
- If the paper tears, make sure all pieces are removed from inside the ADF.
-
Close the ADF cover firmly.
-
Reload your documents:
- Align pages neatly
- Adjust the paper guides so they sit is pushed up against the edge of the paper
- Do not overfill the ADF
 Note:
Note:If the paper jams again
-
Use original documents that are:
- Clean and dry
- Free from staples, clips, folds, or tears
- Fan the pages before loading to reduce sticking.
- Load fewer sheets at a time, especially for thin paper.
Videos for reference
Refer to the video links below for guidance. The process can vary slightly between models.
| Expression XP Series | EcoTank / L Series |
|---|---|
|
Click Here
Example model: XP-2200 |
Click Here
Example models: ET-2840 / L3560 / ET-4810 / L5590 |
|
Click Here
Example models: XP-3200 / WF-2910 / WF-2930 |
Click Here
Example models: ET-2750 / ET-2850 / L4260 |
|
Click Here
Example models: XP-6100 / XP-8500 |
Click Here
Example models: ET-2830 / L3550 |
Prevention
To reduce the chance of future paper jams:
- Load paper neatly and align it with the paper guides
- Do not exceed the paper tray capacity
- Use media that is supported for your product, Refer to the user guide for supported media types.
- Avoid using curled, torn, or damp paper
- Store paper in a dry, flat environment
- Remove all paper fragments after clearing a jam